Showing posts with label Chocolate. Show all posts

Sunday, April 7, 2013

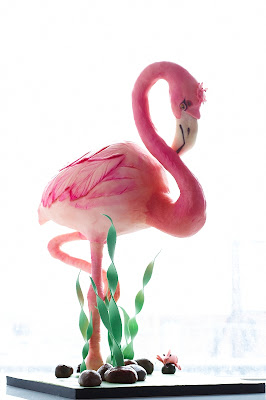
Is this a Cake?


Yes, this is a cake. Okay, I'll tell you the truth, this is not a real cake but it could be. The body of the bird is the cake portion and the whole bird is covered with modeling chocolate.


The head is made of modeling chocolate...

... and the butt and feathers are modeling chocolate.


I also made a shrimp friend for the flamingo in sugar paste. Flamingos eat red shrimps to make their feathers red. Not my flamingo. "She" makes friends with this special little shrimp. Look, Mr. Shrimp is resting on an edible rock to talk to Miss Flamingo!


Here Comes the Train


Couldn't believe time flew by so fast it seems like I just did Adrian's first birthday cake not too long ago.

Adrian loves Thomas the Train and here it is in cake form! Thomas is hand crafted with sugar paste. Do you like him?


The biggest challenge for this cake is actually the cake itself. Turns out that the little boy has quite a few allergies and had to stay away from eggs and dairy products. The cake needed to be made of natural sugar as well. If you know a little bit about baking you will know that eggs, butter and sugar gives structure, fluffiness and flavour to cakes. So yes this cakes contained none of those ingredients! I didn't have any experience in vegan baking and I was lucky to find a really nice vegan gluten-free chocolate cake recipe to start with and changed it to a vegan refine-sugarless version. Since most cake fillings and buttercreams has both butter/dairy and lots of sugar, I substituted with dairy-free chocolate soy ganache.

To recap, that is no butter, no eggs, no refined sugar, no vegan butter, no egg substitute and no splenda. The cake was surprisingly fluffy with subtle sweetness. I still prefer regular cakes but it's hard to tell the cake contained none of those ingredients if I didn't tell you before hand.

What will Adrian's third birthday cake look like next year?


Saturday, February 11, 2012

Pick Me Up!

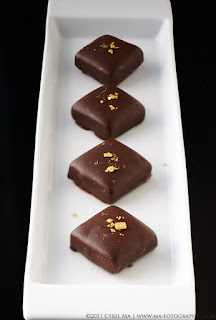
Tiramisu means "pick me up" in Italian. When's a better to make some tiramisu truffles for this Valentine's Day?

There are some recipes on the web for tiramisu truffles that you hand roll into spheres but personally I like dipped truffles better because it's less messy eating them. Since there are outer shells to these truffles, the ganache can be more gooey than hand rolled ones. The result? Burst in your mouth explosion of chocolatiness!

Tiramisu Truffles
Makes about 60
114g milk chocolate
114g dark chocolate
156g heavy cream
28g sugar
160g mascapone cheese
1 tsp espresso powder
1 tbsp+1tsp rum
1 tsp vanilla essence
60 milk chocolate truffle shells
milk chocolate for capping and dipping
dark chocolate shavings, optional

1. Combine heavy cream, sugar and espresso powder into a pot and bring it up to just boil.
2. Make ganache by pouring hot cream over chocolate and let sit for 5 minutes. Stir to combine until smooth.
3. Stir in mascapone cheese, rum and vanilla essence. Let sit till room temperature.
4. Pipe ganache into shells and cap with tempered milk chocolate. Let set. Dip or roll in more milk chocolate. Garnish with dark chocolate shavings.

Friday, December 30, 2011

What a Challenge!

I have recently taken a challenge to attend chocolate confections course at George Brown College.  I have always love baking and cooking and not so much on chocolate or candies. It's out of accident that I attended this course. At the beginning of the course I felt ever so defeated as nothing seemed to work out.

Now that the course is over, I think I actually enjoyed the class very much. Chocolate is a very demanding ingredient. You really need to fall in love with it, communicate with it and be attentive at all times to be rewarded. So next time before you pop a piece of artisan truffle in your mouth, thank the chocolatier and savour the happy moment.

Soft Salted Caramels


Caramel Creams


Gianduja

Monday, December 26, 2011

Trio

I love tarts because they are very versatile for any types of filling. For this year's annual year end gathering, I couldn't decide what to make so I made three types of tarts.

Clockwise from top: Meyer Lemon Meringue Tart, Chocolate Banana Tart, and Strawberry Vanilla Custard Tart.

Sunday, July 10, 2011

Double Chocolate

Have you ever wonder if your store bought chocolate cake a real chocolate cake?  Or is it cocoa cake? Quite a lot of chocolate cake recipes I found calls for mainly cocoa powder, and I always find them dry or lack chocolate flavour. They lack intensity and richness that a chocolate cake should have. It's just different.

There is a chocolate sponge cake recipe I generally use that made of majorly melted chocolate. It's springy, dense with intense chocolate flavour. The beauty of home baking is that you can choose to use better ingredients and not worry about the profit.

I recently purchased the book Miette by Meg Ray with Leslie Jonath. Although I have never been to Miette the last time in San Francisco, the photos of the lovely cakes catches my eye. There's also this double chocolate cake recipe that has both melted chocolate and huge amount of cocoa powder. The product is intensely dark in colour, super moist, and relatively easy to make. I used this recipe to make cupcakes to go with my white sesame buttercream left from grandma's birthday cake, and it was super delicious. This recipe is definitely a keeper.
(Sorry, I won't be posting the recipe on my blog.)

Saturday, February 12, 2011

Happy Valentine's


I made it!

Some time ago when I was cleaning up my bedroom I found my cake ideas notebook. The notebook was nothing fancy to brag about. In fact, it was an old copy book that I scribbled my random cake ideas on. One of the pages drew a flower pot cake filled with real roses. I put the book aside for years, kept thinking that something was wrong with this design, but couldn't tell what it was.

Years after my initial idea was born, I finally know why. I feel strongly against putting inedible stuff on or in a cake. Okay, you need to put dowels for a multi level cake, and you can argue that rose pedals are edible. But I am just against the idea of pulling out thorny rose stems out of a cake. Just not perfect enough.

Oh, if you haven't noticed by now, those aren't real roses. :)


These roses are made out of white modeling chocolate. This pot of flowers are 99% edible. The 1% is the lollypop sticks that I used as flower stems.

The flower pot is filled made of white modeling chocolate, dark chocolate sponge, raspberry buttercream and dark chocolate ganache.


The most common medium for cake decorating is gum paste or fondant. But they don't taste great at all! I found a detailed recipe here for white modeling chocolate and I was overjoyed! That's it, that's what I am looking for!

Assembly was a long process, but I enjoyed it. First, cut out rounds of your chocolate sponge and layer with raspberry buttercream. I used 4 layers of sponge to get the height I wanted. Refrigerate until the buttercream is firm.

Next, you want to prepare some dark chocolate ganache and let it cool.  Using a hand held or stand mixer, whip until the ganache resembles heavy whipped cream. Cover the chilled cake stack with the ganache and smooth out all sides. Put it back in the fridge until it is set.

Meanwhile, start rolling your modeling chocolate. Roll it until it is 3mm. Use a tiny bit of cornstarch on the board to prevent sticking. Use small circle cookie cutters to cut out petals. You will need 9 discs of 1" (2.5cm) to 1-1/4" (roughly 3cm) to make a full blossom rose, and 4 to 5 discs for rose buds. Use a ball tip sculpting tool and a flower forming foam to slowly thin out the disc to the shape of rose petals. (Tips: Modeling chocolate are sensitive to temperature. If it is too soft to hold its shape, pull it to a marble slab or the fridge to firm it out. If it's too stiff and starts to crack on the edges, warm it up with the palm of your hand.) Form the center of the rose by rolling your first petal into a cone shape, then use 3 and 5 petals for the next layers. Open up the petals as you go along, and use the heat of your palm to warm up the edges to make it as life like as possible.

For green leaves, I used green tea powder to tint the modeling chocolate. Form different sizes of leaves using similar method to the rose petals and keep it in the fridge.

When you complete the roses, slightly cool them and stick it on a lollipop stick. Put them all in the fridge or leave overnight to set.

When the cake is completely cooled, roll out the modeling chocolate to a rectangle. Measure the height and circumference of your cake and cut a the chocolate to size. Take out your cake from the fridge and wrap it around the cake sides. It should be the same or slightly higher than the ganache. (You don't want the ganache "soil" to come out of the pot right?) Wrap it tightly around the cake and decorate the pot as you wish. I put a pink bow around the top as flower pots usually have a heavier lip. Put the cake back in the fridge until your roses are ready.

Using green craft tape, wrap the parts of lollipop sticks that is going to expose. Trim off excess sticks to get some height variations. Arrange the roses and leaves on the flower pot and you are done!

These chocolate roses actually taste pretty good. Maybe next time I am going to tint my rose petals with freeze dried strawberry powder for some added flavour and colour.

Happy Valentine's day everyone! Have a sweet one!


Wednesday, February 9, 2011

Puff!


 I haven't been post much since Christmas. I had been busy honing my savory skills. I had made some crazy 4 course new years eve dinner, attending parties and celebrating chinese new year. Now that it's February things should get better right?

I came across Ms. Humble's Raspberry Marshmallow recipe last week and decided to try it out. Of course C likes mango much much more than raspberries so that's the way to go. Oh, did I mention I hate to strain seeds from raspberries? Using mangoes just makes things so much easier. No straining required!

These marshmallows contains real mango flesh. Wonder how I could get ripe mangoes in February? These are actually frozen Taiwanese mangoes that I found from an Asian supermarket. They came in peeled and seeded. Each pack weights 500g and has 4 halves of mangoes. Compared to the Mexican frozen mangoes from Caucasian supermarkets, these taste sweeter and intense, while more elegant and delicate compare to their Philippine and Indian siblings. Now I just keep a pack in my freezer all the time.

As a bonus to this post, here is my first attempt with modeling chocolate. I know the colours aren't that great. Not sure why the edges of the petals kept breaking and leaking oil.  I think it looks like a hybrid of roses and carnations with the broken petals, don't you think?

Thursday, November 4, 2010

My New Toy

I mentioned I just bought a new toy after the previous chocolate class. Finally I have some time tonight to try it out!


Caramelized Hazelnuts on my new marble slab!

I was also practicing my chocolate pre-crystalization skill at home again. The chocolate is setting but something is still not right. I couldn't realise this until my photographer took some really close up shots with his super lens. This calls for more practice!


Saturday, October 30, 2010

The Rise of Adrenalin

Have you ever felt your adrenalin rise when you are baking? That's what I felt in the previous GB chocolate class. We have made a flourless hazelnut torte wrapped in chocolate and garnished with candied hazelnut. Every step is guarantee to keep you on the toes the entire time.


This class was one of the many reasons I wanted to go to this chocolate class. I have been wanting to learn how to make a thin layer of chocolate, bend and mold it around a cake. Every time I walked by the patisseries with cakes wrapped in chocolate I would definitely stop by and appraise of the effortless beauty.

This skill is something that cannot be explained by a recipe. I read through the recipe before class again and again but couldn't figure out how. That made me more curious of the process!


Now that I know how this is done, I am absolutely fallen in love with it! Precision, speed and determination play an important part of this process. That's why this is so exciting! I really and definitely need to do this again very soon, which led to a very heavy purchase hours after class. I can't wait to put my new toy to work! Hey, it was on sale after all!

Friday, October 29, 2010

Ghosts #2


I was getting quite a lot of compliments of my previous batch of dipped strawberries. I showed pictures of it in the office and my co-workers were complaining for not being able to try them out.

Here it is, chocolate dipped strawberries #2. Strawberries aren't in season though so I am not betting on big flavour. Anyhow it is a good exercise to practice tempering chocolate at home.

This is also a good opportunity to test out a new setup for a photo shoot. Aren't the strawberries cute?

Monday, October 4, 2010

Ghosts!!!


We practiced chocolate tempering and piping of strawberry dipping this past Saturday at class. Aren't they cute?

Besides some white chocolate ghosts to prepare for the Halloween, there are also the bride and groom.


Saturday, October 2, 2010

Chocolate Sahara


Saha Cake for a friend's birthday on the past weekend. Chocolate overload!!!
Chocolate sucre pate base, chocolate cake crumbs with truffle cream filling, with chocolate ganache glaze.

LinkWithin

Related Posts Plugin for WordPress, Blogger...