Showing posts with label Birthday Cake. Show all posts

Sunday, April 7, 2013

Here Comes the Train


Couldn't believe time flew by so fast it seems like I just did Adrian's first birthday cake not too long ago.

Adrian loves Thomas the Train and here it is in cake form! Thomas is hand crafted with sugar paste. Do you like him?


The biggest challenge for this cake is actually the cake itself. Turns out that the little boy has quite a few allergies and had to stay away from eggs and dairy products. The cake needed to be made of natural sugar as well. If you know a little bit about baking you will know that eggs, butter and sugar gives structure, fluffiness and flavour to cakes. So yes this cakes contained none of those ingredients! I didn't have any experience in vegan baking and I was lucky to find a really nice vegan gluten-free chocolate cake recipe to start with and changed it to a vegan refine-sugarless version. Since most cake fillings and buttercreams has both butter/dairy and lots of sugar, I substituted with dairy-free chocolate soy ganache.

To recap, that is no butter, no eggs, no refined sugar, no vegan butter, no egg substitute and no splenda. The cake was surprisingly fluffy with subtle sweetness. I still prefer regular cakes but it's hard to tell the cake contained none of those ingredients if I didn't tell you before hand.

What will Adrian's third birthday cake look like next year?


Tuesday, January 1, 2013

Monkey and School Bus Cake

Happy New Year!

Just want to post a recent cake I did. The birthday boy loves monkeys and adores school buses.


You can see Zachary's last year's cake here.

There had been drastic changes in my life in the year of 2012. Till this day I still feel very lost, both in my work, life and my loved ones. But if it has been so tough, it can only be better in the year of 2013 right?

Wish everyone have a happy and healthy New Year.

Sunday, November 25, 2012

Have a Piece of Cake!


Have you ever wonder why birthdays have to be associated with cake? I'm not sure as anyone can come up with a different answer. When I was asked to make a cake for a 70th birthday cake for my friend's father-in-law, I was excited but yet stumbled on the cake design. I have met the birthday boy several times and know that he has a funny character; therefore I decided to make a cake that makes everybody laugh when the cake enters the room.

Chocolate cake with raspberry buttercream is hiding underneath the chocolate fondant (the piece of "cake") and buttercream fondant (the "plate"). Oh yeah the "plate" is edible. A gum paste candle and fork completes the cake on a air brushed "place mat".

Happy 70th Deni! Have a piece of cake!


Friday, November 23, 2012

Feeling Rich


Feeling rich tonight when I was preparing this luxurious cake featuring the birthday girl's favourite brands. The logos were hand painted with 24 carat edible gold dust. The luggage and shopping bag handles were made of modeling chocolate. Wish her a very prosperous 3rd decade and many years to come.

Flavour: Matcha velvet cake with yuzu buttercream.


Friday, October 12, 2012

Edible Bouquet


Had been busy lately so I will let the pictures speak for themselves. A bouquet of roses and mums with made with mango and vanilla buttercream.

Sunday, March 4, 2012

Sexy Sixties


Recently my day job is taking over most of my time. I was so busy that I barely had any time to make dinner to feed myself. When I got a call last week to make a birthday cake, I got so excited and accepted the challenge. Yay for an excuse to get back in the kitchen.

Andrea wanted her mother to enjoy her beautiful sexy decade, hence the sexy sixties cake. The daughter liked the idea of girl in the martini glass from the internet but asked for a realistic direction. I was so happy that I could put what I learned from my life drawing class in school to use and portray the birthday girl in fondant. I also cast sugar diamonds to sprinkle on the birthday girl.


 Who said you can't be sexy when you are in your sixties?
Speaking of sixties, my dad will be turning 60 in August. What should I make him?

Friday, December 30, 2011

Party with Baby Lion and Baby Elephant

I absolutely love this cake. It's so cute I didn't want to give it away. 

It's a simple vanilla cake made with Madagascar vanilla and homemade marshmallow fondant. Sounds simple but oh so flavorful loaded with vanilla seeds and velvety custard base buttercream.

Baby lion and baby elephant riding on balloons to celebrate your first birthday. Aren't they cute?

Thursday, June 30, 2011

Happy Birthday Grandma!

Last year, I almost forgot grandma's birthday and made a sadly looking cake for her. This year I marked it on my calender way ahead of time so I can make her a beautiful looking cake.


Gum paste flower decoration.
This is a green tea sponge cake with white sesame buttercream. A whole jar of Japanese white sesame paste has been added to the custard based buttercream. It was so nutty and velvety. The cake base is my regular sponge cake recipe with 2 teaspoon of match powder baked in a 6" ring. Lined the cake ring with parchment paper to extend the height of the ring. This cake has used the full recipe of sponge cake and was cut into 4 layers. Each layer was topped with a thin layer of buttercream, and more buttercream was used to cover the whole cake. The cake was then refrigerated until firm then applied a special treatment to smooth the surface.

Tuesday, February 22, 2011

Crunch Cake


Lesson learned: never trust any oven other than your own. I have learned this the hard way.

Last week I have divided the bacon pistachio cookies into 2, planning to bake half the batch at my mom's place for them to try. I could have baked them in my own oven and bring the finished cookies to her in an air tight container, but I was running out of time. I just had to cut the log up and place it in the oven. No big deal, right?

Wrong.

I had used my mom's oven quite often when I was still living with her. I knew that the oven has a tendency to burn things at the bottom.  I therefore took extra caution when baking my cookies: chose a light silver baking tray versus a dark non-stick tray, and put the baking tray closer to the top half of the oven. Then only after 10 mins in the oven the cookies are almost burned at the bottom. Sigh... Lucky I caught that on time, and then lower the temperature and flip the cookies over to finish the baking time. They are still edible, but not ideal.

So lesson learned, never trust someone else's oven, and never trust recipes blindly.


This weekend was my aunt's birthday and she had requested crunch cake. There is actually no cake in a crunch cake. The "cake" is actually made of egg white meringues. They are light, airy, crisp and crunchy, and surprisingly not difficult to make.


Strawberry Crunch Cake
Almond Meringue Layer
Adapted from George Brown College Recipe
For 1 - 3 layers of 8" meringue, with extra for a couple of mini meringues

Ingredients:
86g ground almonds
22.5g cornstarch
6 egg whites
341g sugar
1 tsp vanilla extract
1/2 tsp good almond extract

Method:
1. Draw 3 -8" circles on 2 pieces of parchment paper. Flip over and place it on 2 baking trays. Preheat your oven to 275F to 300F.
2. Blend together ground almonds and cornstarch, set aside.
3. Whip egg whites to a thick foam, slowly add the sugar and continue to whip until it becomes stiff peaks.
4. Fold in vanilla and almond extract.
5. In 2 to 3 batches, fold in the ground almond mixture. Make sure there are no lumps or big air pockets.
6. Use a plain piping tip #5 or #6 (not the small Wilton decorating tips, but the big baking tips), pipe the meringue on the parchment in a spiral within the circles. When piping, the tip should be half an inch above the paper, and there should be no gaps between the spiral.
7. Bake for about 1hour & 15 mins until the meringue is dry. Keep an eye at around 1 hour to check on colour. Reduce temperature as necessary. Good meringues should be dry but a light cream colour.

Assembly:
When the meringues are cooled, pipe Chantilly cream with a star tip. Decorate with fruit. Lightly apply more cream and stack another meringue on top. Repeat with another layer and finish the top layer with fruit.
This cake is best to serve the day of assembly. The longer it sits, the higher chance of cracks to develop. You can bake the meringues up to 2 days ahead and keep it in an air tight container.

Sunday, November 21, 2010

Friend or Foe


It's Auntie D's birthday and mom asked me to prepare a cake. For some reason I had ginger flavour in my mind. It's the Asian ginger, not the powdered ginger use in ginger bread man. What a weird idea I had!


This is what I finally came up with - ginger bavarian cream with lemon mousse. It was an interesting combination of flavours. Fresh grated ginger juice gave the bavarian cream a nice subtle kick. The sweetness of the cream was balanced out by extra tangy mousse. I did some research and found out that fresh ginger contains an enzyme that retards gelatine to set. I have juiced a piece of ginger the size of a palm, boiled and reduced the juice to about 2.5 tablespoons and add to the bavarian cream mixture.  I was praying for the mixture to set and it did!

The lemon mousse I adapted from Jamie Oliver, reduced majorly on the sugar to get the tangy flavour.

Extra tangy lemon mousse
• 135g caster sugar (reduced from 185g)
• 3 large eggs, separated
• juice and grated zest of 2 lemons
• 3 tsp powdered gelatine
• 200ml 35% whipping cream (reduced from 300g)

Whisk the sugar and egg yolks together in a large bowl until pale and thick. Whisk in the lemon juice and zest. In a small bowl, combine 100ml boiling water with the gelatine and whisk until it dissolves, then add to the yolk mixture. In another bowl, beat the cream until soft peaks form, then fold into the yolk mixture. In yet another bowl, whisk the egg whites until stiff peaks form and fold into the cream mixture. Transfer to a clean bowl and refrigerate until ready to use. Pipe with a pastry bag into the middle layer of the cake.

Sunday, November 14, 2010

A Sexy Cake


I just love this cake! Velvety smooth yuzu buttercream enveloping a moist green tea genoise, crystalized almond to add crunch and decorated with yuzu glaze and white chocolate curls. The tone on tone cream colour outside looks so sexy hiding the surprising cross section of vibrant green.


Buttercream has quite a long defrosting time. It just won't taste good until it comes to room temperature. Due to the high ratio of butter, the texture resembles very much like cold butter. I wouldn't imagine anyone would like to eat cold butter when the texture is hard and brittle and it tastes dull - well maybe except sandwiched in a pineapple bun. Generally buttercream will take at least an hour to come to room temperature; and therefore making it perfect for travelling. When made properly, all parts of the recipe should be cooked and save to eat after a few hours at room temperature.

I have refined the yuzu buttercream recipe by taking an extra step to sieve through the yuzu syrup before adding into the buttercream. Since the zest is not going into the buttercream I have added another tablespoonful of syrup and the result is a little bit sweeter than I would prefer. Next time I would cut down the sugar to 60g. You can find the recipe here.


To kick up the genoise a notch, I reserved a teaspoon of chopped yuzu zest from the buttercream and added to the cake. That extra tiny bit added intense flavour and tied perfectly with the cream.

Sunday, October 24, 2010

The Real Deal


"Should I or should I not?"

That was what I was thinking at the liquor store in front of a wall of shelves with alcohol. I have been eyeing on this recipe for a few years and this is the time to do it! All I am missing is 5 ml of good raspberry liquor. And out of all the different types - from bacadi rum to vodka infused with gold, and even champagne sell in mini bottles - the only raspberry liquor available only comes in big bottles. The price is not cheap either. So should I, or should I not.

And as the photo has given you the answer.

I could not believe I just spent 40 dollars on a bottle of alcohol that I can make over 200 of the same cake of. You can buy some really good cake out of the 40 bucks already. I must be insane. This recipe has to be good.

So what did I make? A 3 layer chocolate sponge cake with raspberry butter cream and dark chocolate ganache. That was some intense flavour I put together. Besides the raspberry liquor, I have added pureed frozen raspberries that I have sieved by myself into a egg yolk based butter cream. That was some intense flavour and colour I've got there! If I didn't mix the concoction myself, I swear the mixture looked like the butter cream had been contaminated by artificial food colouring.


With the intense butter cream, I have paired it with a dense chocolate sponge cake. The initial batch was much thinner than I have anticipated and the colour wasn't as dark as hoped, so I scraped the first batch and edited the recipe on hand. Unlike regular chocolate sponge cake, or cacao sponge cake I should say, this recipe is darker, denser and much heavier thanks to the addition of melted chocolate. And this recipe only calls for egg whites, which in some way you feel less guilty eating it because of the absence of cholesterol intensified yolks. So should we move on to the recipe?

Intense Chocolate Sponge Cake
inspired by The Sweet Trick by Susumu Koyama
recipe doubled to make 8" round cake
Ingredients
320g egg whites
170g sugar
160g bittersweet chocolate, broken into small pieces (I have used 72% for this recipe)
90g whipping cream
5g butter
10g cacao powder ( I have used Ghirardelli)
80g cake flour with a pinch of salt

  1. Boil whipping cream and add to the bittersweet chocolate placed in a heat proof bowl. Let sit for 2 to 3 minutes. Stir with a whisk until smooth. Slightly warm up in a double boiler if there is not enough heat to melt the chocolate. Add butter until completely dissolved.
  2. Whisk egg whites until soft peaks. Gradually add sugar while whisking until stiff peaks formed.
  3. Add half of egg whites to the chocolate ganache in step 1. Fold it in. Add sieved flour and cacao powder and fold until just incorporated. Add the remaining egg whites.
  4. Put the mixture in an 8" round cake pan and bake at 325F for 50 to 60 minutes. There should be a slightly crusty top and toothpick comes out clean.
  5. Invert cake pan on a wiring rack and let cool.
Creme au Beurre Framboise (Raspberry Butter Cream)
30g water
90g sugar
36g egg yolk
180g unsalted butter
120g raspberry puree
5g raspberry liquor (I have used Chambord)
5g lemon juice

  1. Boil sugar and water in a small pot to soft ball stage (118C).
  2. Slightly whisk egg yolks, the slowly drizzle in hot sugar syrup while whisking. Whisk until thick and ribbon stage. (The recipe calls for whisking the mixture over a double boiler until 82C, which mine refused to heat up after reaching 62C. I have done some research online and saw other similar recipes without this stage. Next time I would try to omit the double boiler step.)
  3. Beat softened butter until smooth. Add the egg yolk mixture to the butter and stir.
  4. Stir in puree, liquor and lemon juice. Refridgerate until use.
 Now I need to find more recipes that require raspberry liquor to use up my big bottle of Chambord.

Saturday, October 2, 2010

Chocolate Sahara


Saha Cake for a friend's birthday on the past weekend. Chocolate overload!!!
Chocolate sucre pate base, chocolate cake crumbs with truffle cream filling, with chocolate ganache glaze.

Friday, August 27, 2010

In Disguise


Sometimes what you see is not what you get.

The same applies to daddy's birthday cake.

It might look like a strawberry charlotte, but it's not.

Maybe it wanted to be a strawberry charlotte, that's why it was covered in strawberry.


No, this is a mango charlotte.


I had no idea why I arranged to meet up with my friends on Wednesday night, when clearly I need to make a cake for Thursday. I needed to make something that is not labour intensive, and I can make part of the cake ahead of time. I decided to make a charlotte as I can bake the cake on Tuesday night, freeze it, then make the mousse quickly on Wednesday night after dinner. The plan was to make strawberry mousse, but it was getting late and making seedless strawberry puree was not an option. I opted out and changed my mind to make mango puree instead.


I was looking for a recipe for ladyfingers online and I found one from Le Cordon Bleu.  The recipe seems easy but I couldn't figure out how to get 6 tablespoons of icing sugar on top of the batter.  I had to stop at 2 tablespoon, wait for 5 minutes, then sprinkle 2 more tablespoons over the top. It is just impossible to get 6. The overloaded sugar helped create a slightly crunchy surface, but it also melted during baking and sat between the ladyfingers. It made curving the cake difficult. Next time I will only sprinkle 2 tablespoons before baking and sprinkle the other 2 after they come out from the oven. That way the cake surface should stay dry and crunchy.

Wednesday, July 14, 2010

Red and White


I knew my co-worker's birthday is in July but I couldn't remember the date. At around 5pm I got reminded it's actually tomorrow! And I have a deadline at work tomorrow! And I have to stay late to finish the work before I leave. What to do?

I started composing a cake that is fast and easy to make. I decided to make cupcakes as I know the office will be super crazy tomorrow and we wouldn't have time to spare to cut a cake. I bought Roger Pizey's Small Cakes: from Fondant Fancies to Florentines last week and I want to test the cupcake recipe first. So here it is (you can actually get this from the Amazon website):


Vanilla Cupcakes
Makes 8


2 eggs
175g caster sugar (I had reduced to 145g)
140g plain flour, sifted
small pinch of salt
1/2 tsp baking powder
75ml heavy cream
50g melted butter
a few drops of vanilla essence


Preheat the oven to 180C/350F. In a mixer, whisk the eggs with the sugar until fully blended. add the flour, salt and baking powwder a little at a time, and whisk together. Mix in the cream, then fold in the melted butter. Finally, add a few drops of vanilla essence.
Place muffin cases in a muffin tray and fill 3/4 full with the mixture. Bake for 20 minutes on the miffle shelf until golden brown. To test the cakes are gooked, gently pushed a skewer or small knife through to the centre of one cake - it should come away clean. Leave the cakes for a minute in the moulds, then turn out onto a wire rack to cool. Decorate with the toppings of your choice.


It's really easy to make and they smell so good when they are in the oven. I also made a white chocolate raspberry ganache and pipe it in between the cake batter before I put it in the oven.

White Chocolate Raspberry Ganache
(adapted from Fields of Cake and Other Good Stuff)

3.3 ounces fine white chocolate (cut into 1/4 inch or less pieces)
1 Tbsp. unsalted butter (softened)
21ml heavy cream
pinch salt
1 tsp. dark rum or raspberry liquor, like Chambord
20ml strained raspberry puree

1. Place chocolate and butter in a medium heatproof bowl and set aside.
2. Bring cream, corn syrup and pinch of salt to a boil in a small sauce pan over medium heat, immediately pour over chocolate and butter, shimmy the bowl to help the chocolate and butter settle under the cream and cover the bowl and allow to sit for two minutes.
3. Uncover and stir gently until mixture is smooth and silky.
4. Add rum until fully incorporated.
5. Whisk in raspberry preserves until fully incorporated and smooth.

Saturday, July 10, 2010

Calling Emergency


Maybe it was my subconscious, or maybe my sixth sense.

Or I just love to bake that much.

I woke up today at 7am without an alarm and I can't fall back to sleep. I got out of bed and I start making bagels. Just because I want to.

As I was shaping my fourth bagel my phone rang. "Who would call me at 9am on a Saturday?"

It turns out to be my mom, asking me if I remember it was grandma's lunar birthday today.

GREAT!

Don't get me wrong, I am usually the one who remember birthdays. We usually keep a calendar in the bathroom and every January I would write down all the birthdays and holidays of the year. Usually I would stare at the calendar while I brush my teeth and plan about the month's baking plan. But as I moved out and I don't have a calendar in my bathroom anymore, and I don't actually own a lunar calendar at my place, it's hard to keep track of lunar birthdays.

That means I need a cake by 6pm today, I am still making bagels in my PJs and I haven't have breakfast yet. I roughly finished my bagel dough and put them in the fridge, and start browsing for birthday cake ideas while I was in the shower and head out to grab a croissant for breakfast.

By the time I got back it was almost noon but I had a plan. I will be making green tea mousse cake with red bean filling for gran's birthday. I put the cake in the fridge at around 3pm to let it set. Not bad huh?

And I still managed to have time to buy myself a new camera before I decorate the cake and head out for dinner celebration.  I am rocking it!


Green Tea Mousse Cake with Red Bean Filling
I borrowed part of the recipe from the RTHK eLearning website. I skipped the red bean cheesecake portion and make it into a jelly just to make it lighter. I like the texture with the mousse but next time I would cut down the portion in 1/4. I have reduced the amount in the following recipe. I would also pour the red bean directly on top of the cake so that the filling sticks better to the rest of the cake. The overall taste is still good though!

Green Tea Sponge Cake
Ingredients:
1 egg
24g sugar
20g cake flour
2g green tea powder
8g melted butter, cooled

Method:
Whisk egg and sugar with an electric mixer until the mixture is in ribbon form. Fold in sieved cake flour and green tea powder. Add melted butter. Bake in a 6" spring form pan and bake it at 350F for 15 minutes.

Red Bean Filling
150g store bought red bean paste, preferably without beans
75g water
3/4 teaspoon gelatine powder

Bloom gelatine with 10 g of water from the recipe. Melt with microwave until dissolved. Add the rest of the water to the red bean paste and stir until combined. Add melted gelatine and combine. Pour over sponge cake and freeze until set. (It's easier to handle afterwards if you put it in the freezer. Don't leave it in too long though or the water will get crystalized.)

Green Tea Mousse
200g whipping cream
80g sugar
12g green tea powder
80g cold water
4g gelatine powder

Bloom gelatine with some of the cold water. It doesn't matter how much as you will eventually mix them all together. Microwave until melted. Add sugar.
Use the rest of the water to dissolve green tea powder. Add melted gelatine and let cool to room temperature.
Whip cream to soft peaks. Add a scope to the green tea mixture and incorporate, then mix it in the cream.

Assembly:
Take out the red bean filling/cake from the freezer and release from the mould. Put the cake at the bottom of a 7" ring mould and pour the green tea mousse on top. Make sure the mousse fill up the sides of the cake. Refrigerate until set and add decoration.

Thursday, July 1, 2010

Happy 143th Birthday Canada!


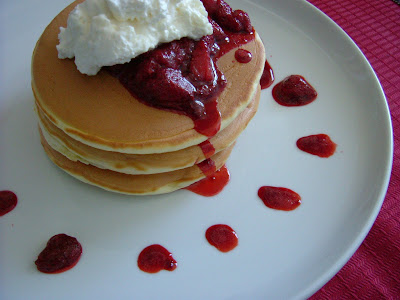
To kick start my 4 day long weekend, I made simple pancakes for breakfast with fresh strawberry balsamic sauce. A red and white breakfast to kick start the celebration!

Strawberry Balsamic Sauce
The list of ingredients are for rough reference only. Don't forget to taste, taste, taste and adjust the amount to your liking.

Ingredients:
2 cups of strawberries, hulled and diced
1 to 2 tbsp sugar
1 tbsp of balsamic glaze/reduction

Method:
On medium heat cook strawberries and sugar in a saucepan for about 5 minutes until berries become bruised and juice releases. Lower the heat and simmer for another 10 minutes or until the juice reduces to a syrupy consistency. Stir occasionally to avoid burning at the bottom. Add balsamic glaze and stir. Serve with pancakes or waffles with a dollop of whipped cream.

Monday, June 21, 2010

Yuzu for You

This birthday cake ends the birthday cake marathon I had for the past 2 weeks. Since the beginning of June I had been making birthday cakes for my boss, grandmother, myself, my co-worker, and yesterday, my other co-worker.  For some reason my boss hires 100% women Geminis to work for her (that makes 3, including herself, yes I work in a small company) So if you consider 1 woman is trouble enough and people born in within the horoscope have dual personality, that's 6 women in the house and 6 times the trouble.

Enough of that. So what did I make to end this marathon?


Yuzu Buttercream Cake
I was going to make half a batch of yuzu and half a batch of lime buttercream for the cake, although I am not sure about the favour pairing. I did a bit of taste testing, only to know that the limes I bought the other day are totatlly flavourless. Nonetheless, each of them only gave me a teaspoon of juice, even though they were in room temperature and I rolled them before juicing.

I have read quite a few recipes before attempting to creating this version. A few of them, like the basic swiss meringue by Martha Steward, are very easy to make, but I never liked the marshmellowiness of swiss meringue on its own.  Having known that the birthday boy adores sweets and creams, just like how he ate double portions of mango opera and triple portions of the strawberry custard cake, I have envisioned a buttercream for his cake. And checking the weather forecast of the day predicting 37 degrees in humidex, and knowing that they won't go home immediately after pick up, I need something sturdy enough to withstand the environment.

I finally settled down with this recipe, and have my own twist. It did not say in the recipe what type of meringue it is, I picked the Italian method knowing that it is the most stable. It did not explain the method of the custard base either, so I made up my own. It ended up with the following recipe which I would consider having a difficulty level of 9.9. I started making the buttercream at the start of the World Cup match between the Dutches and the Japanese, only to ruined a batch of syrup, almost flopping my meringue and the custard consistency looking more like I was whipping up a sponge cake recipe. Luckily I managed to get the cream done just when the soccer game ended. That's 2 hours of hard work!

OK, here is my version and method if you want to challenge yourself.


Yuzu Buttercream
(inspired by 獨角仙)
I have recalculated the recipe so that easier to manage by using whole eggs.
A (custard):
  • milk 100g
  • vanilla extract a few drops
  • egg yolk 57g (about 3 large yolks)
  • sugar 96g
B(Italian meringue):
  • egg white 66g (2 large egg whites)
  • a pinch of salt
  • sugar 123g
  • water 30g
C:
  • butter 443g (yes, that's a pound minus 11g of butter)

D (flavour):
  • yuzu syrup, to taste (about 3 to 4 tbsp)
  • lime/lemon juice, to taste  (about 2 tbsp)

Method:

Custard A:
Heat milk with sugar until scalding. Whisk yolks and vanilla in a heatproof bowl. Temper the yolks with the hot milk. With an electric mixer, whisk the custard on a double boiler (or theoretically return to the pot works, but it's easier to beat) until it foams up like sponge cake consistency. Remove from heat and keep beating until it cools. Cover and set aside.

Meringue B:
Add a pinch of salt to the room temperature egg whites and start with low speed whisk the whites for a few minutes. When it starts to foam, gradually increase speed. While the egg whites are whisking, boil sugar and water to 118 degrees C (reduce heat when it gets above 100 degrees). When the whites turn into soft peaks, gradually drizzle the sugar syrup into the meringue. Keep beating until it becomes glossy and very stiff peaks.

Butter C:
Dice into small pieces.

Flavouring D:
Chop up yuzu syrup in a food processor until it turns into a creamy colour. Pass syrup through a fine sieve to elliminate any zest. Discard the zest or keep it for another use.

Assembly:
Fold meringue into the custard in batches. Slowly add butter into the mixture and mix with an electric mixer. Add only a few pieces at first, as it is prone to break. If it looks like it is starting to curdle, stop adding butter and keep beating. Once it's stable, you can add butter at a faster pace.
Add flavouring and adjust according to taste.

I made a fold on the lid of a regular cake box to accommodate the extra tall pyramid!

LinkWithin

Related Posts Plugin for WordPress, Blogger...