Showing posts with label Today's Dessert. Show all posts

Friday, October 29, 2010

Ghosts #2


I was getting quite a lot of compliments of my previous batch of dipped strawberries. I showed pictures of it in the office and my co-workers were complaining for not being able to try them out.

Here it is, chocolate dipped strawberries #2. Strawberries aren't in season though so I am not betting on big flavour. Anyhow it is a good exercise to practice tempering chocolate at home.

This is also a good opportunity to test out a new setup for a photo shoot. Aren't the strawberries cute?

Tuesday, October 19, 2010

Toffee Apple Mousse Cake


Today it started off wrong.

I keep waking up in the middle of the night feeling horrified. I think I had a few dreams but couldn't remember what they were about, just the sad, horrified, troubled feeling remained and I couldn't go back to sleep until dawn.

Okay, time to cheer up.

I made these toffee apple mousse cake on the weekend but I was too full to eat them last night. Tonight's dessert it is!

This is actually the second time I tried this recipe but there are still glitches that I would like to iron out.

For say, the slices of apples are quite pretty lined up in the gel, but they made digging in difficult without collapsing the cake. Boo. The recipe of that layer needs to be refined as well as I found the alcohol taste a bit too strong. This is one part of the cake that I had to improvise as the original recipe does not have amounts or much description of how it was made. Although I keep tasting it during the process and liked it on its own, the flavour changes when it was paired with the other parts of the cake.

I was actually surprised by the mousse portion. The original recipe called for apple puree. Being too lazy and not having the right equipment to puree apples, I turned to store-bought unsweetened apple sauce. Could have been better if the texture is smoother but it saved me a lot of time! Maybe next time I would substitute with a vanilla bean bavarian cream if I opt for a more refined version. Still, I wouldn't mind exchanging a bit of fibre for some texture.

There was also a sour cream layer in this cake which I absolutely adore. I would use it again for other fruit cakes in the future. The slight creaminess and tang lightens up the cake.

The best part of this cake was the bottom cookie layer. It was just too good. It had a wonderful butter taste and fell apart in the mouth. I had doubt when putting together the recipe but very surprised on the result.


Translated from 創意蛋糕50款 published by Super Chef Book

Cookie Crust
softened butter 225g
salt 3g
sugar 120g
2 egg yolks
rum 20g
cake flour 190g
bread flour 20g
ground almond 30g


  1. Soften butter at room temperature.
  2. Add salt and sugar to incorporate.
  3. Mix in egg yolks, then add rum.
  4. Sieve flour and ground almond to the above mixture. Mix until just incorporated. Wrap the mixture in plastic wrap and rest in the fridge overnight. (Note: the mixture is very soft and difficult to work at room temperature. Keep it in the fridge until ready to roll.)
  5. Roll into 1.5cm thick. Cut into desired shape. Put it on a parchment lined tray and return to the fridge until the oven is ready.
  6. Preheat the oven to 160 C. Brush dough with egg wash and bake in the container for 45 minutes. (Note: since this cookie spreads a lot and doesn't cut easily without breaking, it is necessary to bake them in the container to retain it's final shape.)
  7. Cool on a wire rack.
Apple Mousse (Note: one of this recipe will make enough for half of the above cookie crust.)
Apple puree/apple sauce 150g
gelatin 3g
egg yolk 20g
sugar 25g
whipping cream 80g
Calvados apple brandy 10ml (Note: optional to enrich flavour)

  1. Warm up apple puree on a double boiler.
  2. Bloom gelatin and add to the warmed puree. Add apple brandy and stir.
  3. Make egg yolk and sugar mixture. (Note: I whisked the yolk and sugar over a double boiler until ribbon stage.)
  4. Add #2 to #3 and mix well. Cool down
  5. Whisk cream to stiff peaks and fold into #4.
Cream Cheese Mixture
Cream cheese 150g
Sour cream 30g
sugar 20g
whipping cream 100g

  1. Mix the first 3 mixture until smooth.
  2. Whisk cream and fold into the above mixture.
 Toffee Apple
(Note: Recipe still needs to be adjusted because of the ingredient availability in North America. Basically you need to melt some butter to fry the sugar to make a toffee sauce. Add the apple slices and fry at high heat. This recipe should take 4 big apples from my experience.)

Assembly
Align apple slices at the bottom of the mold. Pour in apple mousse. Refridgerate.
Smooth a (3mm) thick cream cheese mixture over the cookie. Invert the cookie onto the mousse. Invert the assembled cake and brush with glaze.

Thursday, October 14, 2010

Leak Proof


When I started baking, apple pie was almost the first thing I began with. I love pies, and the recipe doesn't seem too difficult. Or is it? Soon I realized that even though the recipes seemed easy, they don't necessarily described the skill involved. and I always ended up with leaky pies with juice spilling andsoggy pie crust.  No matter how many times I tried - from apple pies to strawberry pies -  the result would be similar. Soon enough I gave up the idea of pie.


And then the beginning of this year I went to George Brown to take the basic baking course, and the first thing we made was apple pie.  So there are tricks to make pies leak proof and aren't written in the recipes.  No more leaky pies!

This time I made the pies smaller at about 6" in diameter. It should feed 3 to 4 people or makes a hearty dessert for 2.


There are a few things to make pies leak proof:
  • Your fruit has to be really dry. This is just too obvious right?
  • Pectin is crucial in solidifying liquid in fruits. Make sure when preparing apple pies, retain as much as pectin as possible. Using a vegetable peeler than a knife to peel the apples is a good start as most of the pectin can be found directly under the skin.
  • Use modified corn starch for the filling.  Modified corn starch is mainly for commercial use and not easy to find in small portions, making it difficult to use for home baking. Or,
  • Activate the starch before putting into the pie. This could be done by cooking the starch with the natural fruit juice then mix it in the fruit before putting the filling in the pie shells. This method can be easily done at home if modified starch is not accessible. This method has been used in my recipe of apple brioche recipe.

Monday, October 4, 2010

Ghosts!!!


We practiced chocolate tempering and piping of strawberry dipping this past Saturday at class. Aren't they cute?

Besides some white chocolate ghosts to prepare for the Halloween, there are also the bride and groom.


Thursday, September 16, 2010

A Perfect Ending


It's almost the end of my vacation. Time to get back to work tomorrow! But not just yet, this vacation yearned for a sweet touch to end. As I was still clueless in the kitchen after my time away, I tossed some hulled strawberries with some balsalmic vinegar glaze and added a touch of black pepper, 3 mini scoops of HD vanilla ice cream and vola! a simple dessert! Time to forget about unpacking and the loads of laundry ahead of me! Oh, and get up early for work tomorrow.

Thursday, July 8, 2010

Mango Cheesecake


It's super hot in Toronto these days.

Hot, I mean, very hot.

I can't stop myself screaming ~ Hot!!!~ every time I had to step outside. It's at least 40 degrees outside for the past week.

Since it's so hot the last thing I want to do is stand next to a stove or turn on the oven. I have been on a cold food diet for the past few days. Salads, cold noodles... and that applies to dessert.

I had made this no bake mango cheesecake years ago and I had misplaced the recipe for the last few years. Luckily I uploaded the recipe on a baking forum back in 2005 and I was able to dig it up from the oldest post they had.

So here it is, I am sharing it on my blog, just so I don't loose it again. Try it and enjoy the hot but nice weather!


No Bake Mango Cheesecake

Crust
Ingredients:
1/4 cup melted butter
1 cup graham cracker crumbs

Method:
Mix thoroughly. Press down at the bottom of a spring form pan. Refrigerate while working with the filling.

Mango Cheese filling
Ingredients:
250g cream cheese, room temperature or slightly warm in the microwave until pliable
60g sugar
220g heavy cream
4 tsp gelatin powder
3 tbsp water
2 ripe mango or 200g mango puree
rind and juice of 1/2 lime

Method:
  1. Soak gelatin in cold water. Melt in the microwave or hot water bath. Set aside.
  2. Whip heavy cream to 60% stage. * Set aside.
  3. Mix cream cheese until there are no lumps. Add sugar and mix thoroughly.
  4. Add mango puree, lime rind and juice to the cream cheese mixture. Add melted gelatin.
  5. Fold in the whipped cream until just combined. Pour mixture over prepared graham cracker base. Refrigerate until set, at least 2 hours.
* Note: 60% stage is when you start forming ripples but not quite forming soft peaks.  I would say soft peaks stage is about 80%. If you over whip the cream in this recipe the cheesecake filling will be too foamy and you will get bubbles in your cheesecake.

Wednesday, June 23, 2010

Hello Helo!


Although Toronto is considered a diversify city, and we can get almost everything from different countries, there are still things hard to find. Sometimes you try all your local stores you can't even find a trace of it. Chowhound is a good place to start looking for rare items, but when it tells you that the closest place you can get an item is 30 km away, it's kind of depressing. I know, I know, there are online stores and they will send the package to you within a week, but if it's food I would still want to touch an item, check it out, before I pull out my purse.

A few weeks ago I was early for lunch and came across this small local grocery store. I found the Helo chestnut puree in a toothpaste container. They also sell it in a big can too. Curious of the product I got myself a tube.

So here is the verdict: the puree is by far the most stiff compare to other chestnut puree you can find in big chain supermarkets. The flavour is more condensed, nutty with a slight hint of smokiness. The smokiness is very subtle as it the chestnuts had been roasted prior to mashing. It has the right amount of sweetness. It also has a special cap with 6 small holes for squeezing out the content directly on your dessert. I find it a bit stiff for my hands to squeeze and since it is a bit too stiff the strands aren't that long. It does say that it doesn't need to be refrigerated but it has to be consumed within 2 days once opened.

I had some leftover chocolate sugar crust and sponge cake in my fridge so I made this simple mont blanc for tonight's dessert. The taste wasn't bad. Nobody will know the chestnut puree came directly out of a tube.

Although I haven't tried, but I think the following will be easy enough for kids to make, as all the ingredients can be bought from the supermarket, except the chestnut puree of course.


DIY Mont Blanc
Ingredients:
Digestive Biscuits (with chocolate glaze should taste better)
sponge cake / pound cake
Chestnut puree
whipped cream

Method:
Place 1 digestive biscuit on the plate. Put a teaspoon of whipped cream on top. With a cup or cookie cutter, cut out a circle of sponge cake. Mix whipped cream with chestnut puree in 1:1 portion and apply on cake. Pipe more chestnut puree strands to cover everything.  Serve.

Wednesday, May 5, 2010

Fruit Pastry Cake

Ever have the feeling in the morning when you just know the world is not in favour of you for the rest of the day? Today I feel just like that.

Good that this feeling didn't last long, perhaps because I have freshly baked goodies for breakfast?

I made this fruit pastry cake late last night. Recipe was from Happy Home Baking but I made a few changes to the ingredients, simply because I don't have sour cream in my fridge.  I have also halved the recipe to make a smaller cake.

Fruit Pastry Cake
Ingredients (for a 6" cake):
50g butter, soften to room temperature
75g caster sugar
2 eggs (I should have added about 15g of milk / cream to compensate the lack of sour cream)
105g all purpose or cake flour
1/2 tsp baking powder
a pinch of salt
a dash of vanilla extract
fresh / frozen fruit to decorate

1) Butter a 6" springform pan and dust the surface with flour. Shake off excess. Preheat oven at 350 degree farenheit.
2) Cream butter and sugar until light and fluffy. Gradually add in eggs and milk until incorporated. Add vanilla extract.
3) Sieve together flour, baking powder and salt. Blend with egg mixture until just incorporated.
4) Pour batter in the prepared springform pan. The mixture might look little but it will rise up to 3/4 of the pan after baking. Decorate with fruit on top. I have used canned peaches, frozen strawberries and blueberries.
5) Bake for 55 to 60 mins. Check doneness by inserting a toothpick in the middle and it should come out clean. Rest in pan on a cooling rack for 5 to 10 mins before unmolding.


I have glazed the top of the fruit after baking with a bit of glaze to preserve the fruit. Glaze: juice from the canned peaches (about 6 tablespoons) with a bit of cornstarch (about 1/2 teaspoon); mix together until there's no lumps and put it in microwave at medium heat at 8 second intervals.

Saturday, April 17, 2010

Strawberry Shortcake


The name “Strawberry shortcake” never sound too much to me. It's just strawberries, simple sponge cake and whipped cream right?

Maybe I have seen quite a lot of strawberry shortcake photos from Japan. It's a big hit there for special occasions. The Japaneses' decoration skills are impeckable. They can make anything look good.

Even it sounds simple and easy to make, I have never done a proper strawberry shortcake, probably because it is too simple and not challenging.

Wrong.
If you do it properly and thoughtfully, it can actually be a very nice cake. Tasty, springy, light and sweet.

Thanks Chef Amjed for his useful hints during the course!

Tuesday, April 13, 2010

Labour of Love / the Love of Labour


Happy birthday mom!

Mom doesn't soft, mushy cakes and dislikes any cakes with rough textures or chunky nuts. A bit too boring in textures for my taste but since it's her birthday you just got to obey the birthday girl. I decided to make a galette for her since she had always wanted to try one.

A simple recipe but it is a labour of love. I spent at least an hour and a half standing at the stove to make all the crepes and another 30 minutes to make the mango custard filling with fresh mango puree, custard and whipped cream.

This time the custard is thicker than the orange filling I made previously so it only took 15 crepes. I sliced up big slices of mango and arranged them every 5 layers.

Thanks to the delicious mango the mango is sweet, rich and delicate. A lovely dessert! The intensive labour is all worth it.


Thursday, March 25, 2010

Galette a l'Orange


The following recipe is merely a trial and error. It was late in the evening. With the clock ticking and thinking about an impossible deadline at my daywork, I did some silly mistakes. I whipped cream in a fresh out of the hot dishwasher bowl. If you haven't known this fact, this is basically how to churn butter from cream. Tomorrow I am going to have the by-product of my silliness – hand churned fresh butter on toast for breakfast.

I have seen galette in photos before but I have never tried one. I always wanted to try making one but consider it quite time consuming. At one time I was attempting to make one, only to realize that my crepe making skill sucks and it takes a lot of batter to make a cake big enough for my entire family.

On the past weekend we hosted a house warming party and I got a gift card for a kitchen store. Besides a few other wine gadgets, I picked up a 5” non-stick pan. It's cute and it's good for pan frying small items. I made a galette with this pan.

Since the pan is so small, crepe making was easy. I followed a crepe recipe from Kate Habershon's Pancakes and Waffles book and prepared half a batch of crepe recipe. It might seem like a small quantity, but you can actually cut 4 healthy portions out of it. The half recipe made about 28 crepes, and my galette assembled to a sexy height.

The filling was my own creation, it was a trial and error of putting this and adding that to adjust the taste and consistency. It actually turned out great! I did not follow any recipe so I am actually surprised by the result.

Galette l'Orange
Crepe:
(recipe from Pancake and Waffles page 55)

Filling:
2 tbsp room temperature cream cheese
zest of 1 orange
1 tbsp fresh orange juice
2 tbsp honey
1 egg yolk
1 tbsp cornstarch
¼ cup milk + 1 tsp sugar, scald
¼ cup whipping cream, whipped to stiff peaks

Method:
  1. Reserve some long strands of orange zest for garnishing. Finely zest the rest of the orange and mix with cream cheese. Ensure there is no lumps. Set aside.
  2. In a heat proof bowl, stir egg yolk and cornstarch together until there is no lumps. Temper the egg yolk with hot milk and return to heat while whisking constantly until custard is thick enough to coat the back of the spoon. Add orange juice to thin out the texture and add flavour. Add honey and taste to adjust sweetness.
  3. Add custard into cream cheese mixture. Let cool completely.
  4. When mixture is completely cooled, fold in whipped cream. Keep cool until assembly.
Assembly:
  1. Select a good looking crepes to put on the top. Set aside.
  2. Layer the crepe using about 1 tablespoon of filling. Spread with a palette knife. Keep stacking until you finished with the crepe. Layer the good looking crepe on top. Keep in the fridge until time to serve. Dust the top with icing sugar. Garnish with candied orange zest and serve with remaining filling.

    The galette can be kept covered for up to a day or assemble prior to serving.

Wednesday, March 17, 2010

Chocolate Pavlova

So "United Nation Week" continues...

After sunday's Italian night, we had:

Monday: Chinese (I wasn't too happy about this as we almost had chinese food everynight in the past 2 weeks.) I made bean curd pillows.

Tuesday: Korean Gamjatang. I found the recipe on Maangchi website and I did a bit of alteration according to my taste. Surprisingly, it tasted really good! I will definitely make it again.

Wednesday: tonight is Thai night and we had chicken padthai. Another quick and easy dinner and both of us were very full!

I was going to make dessert last night with my leftover egg whites from the previous custard filling for my croquembouche. I absolutely adore the almond egg white crunch cake that I had years ago at my friend's birthday but I had no clue what it is called and therefore cannot search for a recipe online. I settled down with a similar recipe that I can still use up my egg whites - a pavlova. A pavlova is a simple dessert made with a meringue base, whipped cream and fruit. I settled with Nigella's Chocolate Raspberry Pavlova recipe as I have every ingredient ready at my place.

The pavlova ended up to be tonight's dessert instead, as last night when I finished baking, it was already 11:20 and it's too late to eat anything before I go to bed. The meringue is easy to make but it took a long time to bake. Good thing they keep well and can be made ahead of time!


I did not follow the recipe diligently as I should have, but I have no regrets. It's airy and light. The chocolate is not overpowering. It's a good after meal dessert.


Cherry's version of Chocolate Pavlova
Ingredients
Meringue:
3 egg whites
120g caster sugar (I took out 30g of it from the original recipe)
1.5 tbsp cocoa powder, sieved
a tiny splash of good quality balsamic vinegar
25g dark chocolate (I used 85% Valhrona chocolate as I used up my baker's chocolate blocks)

Topping:
1/2 cup 35% whipping cream
1 pound strawberries, cleaned and hulled, chopped and add1 tbsp strawberry jam and mix

Method:
1. Preheat oven to 355 degrees F.
2. Beat the egg whites until satiny peaks then add sugar gradually and beat until stiff peaks form. Sieve over cocoa and add vinegar, and gently fold in finely chopped chocolate to the mixture. Pipe 6 circles of mixture on a paper lined tray, each about 4 inches in diameter. Pipe a ring on top of each circles to form a bowl.
3. Put the tray in the preheated oven and lower the temperature to 300 degrees F. Bake for 50 minutes. Turn off the oven, pop the oven door ajar and leave it in until it is completely cooled.
4. To serve, whip the cream to soft peaks and add a heaping spoonful in each of the meringue. Add strawberries and serve.

It is optional to add shaved chocolate on top of the fruit, but since I used a chocolate with high cocoa content I didn't want to over power the taste of the fruit. You can substitute strawberries with other fruits of your choice, just like Nigella's raspberries. And if the fruit is in season, don't even need to bother with the jam. I just found my strawberries too bland and I happen to have jam in the fridge.


Photography by Cyril.

Monday, March 15, 2010

Big Project Part 2

I am exhausted, but yet satisfied.

It's 5 days till my bf's birthday. I decided to do something special starting today.
We name this week "The United Nation Week".

This is the first day of celebration.

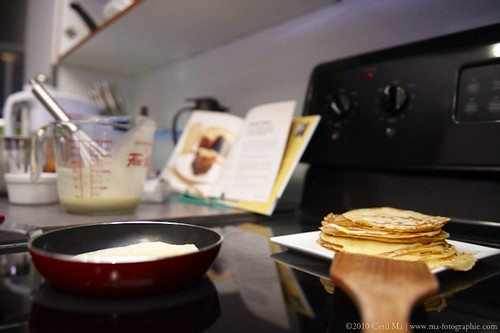
For the opening ceremony, I attempted to make fresh pasta with my new standmixer that I bought last October.

I began with Jamie Oliver's recipe of the basic pasta dough. Not sure if it's the low humidity of my apartment or the size of the eggs, I found it a bit dry to mix 200g of flour with 2 eggs. I end up adding the 3rd egg with a big dash of flour. I also added about a tablespoon of olive oil to add flavour. The dough looked pliable and silky smooth. Not a bad start huh?

Then I attached the new pasta gadget that I got on sale 2 weeks ago to my standmixer. Hey it worked - at least the first 5 inches! And then, uhoh, it stopped! The next thing I remembered was sparks coming out from the motor, and that's it. Hey, it's my first time for fresh pasta dough! Don't ruin my fun... ...

Nope, it did not run again. My first purchase for my new place has stopped running after giving me 15 minutes of fun. I didn't expect the first gift I gave to my bf's for his birthday is to ask him to call KitchenAid tomorrow for warrantee service!

So now what? Back to the basic of course! I whipped out my rolling pin and started my workout. Of course I cannot get to as thin as what the machine can produce. I call it - the udon sized fettucine.

Thank god I started off with a really nice dough, so even though the pasta was a bit thick, it's not that bad at all.

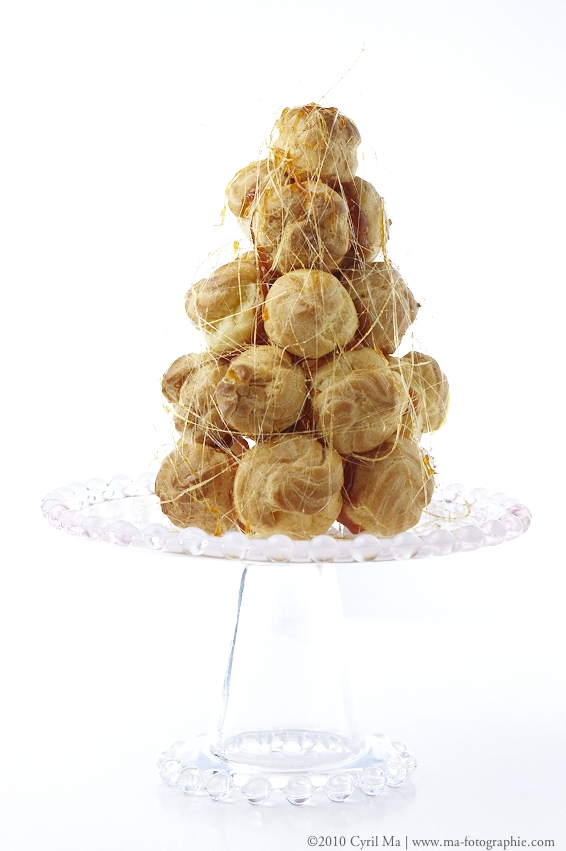
Alright, enough of that. Next off , and the highlight of the night, croquembouch for dessert!


I am not joking. This is my first time to make croquembouche. I had learned how to make caramel and choux pastry separately at George Brown a few weeks ago, but then I burnt my caramel badly in class and the choux pastry was only plain jane with whipped topping. This was actually a test piece. (Oh yeah, I think I got this bad habit from my mom, both of us love trying out new things when we expect to have company or making gifts. We rarely test out recipes prior to the events. A lot of times it fails of course. Haha.)

I actually baked these little puffs last Thursday. The keep really well if you do it right.


I freshened up the puffs by putting them briefly in the hot oven to get rid of a bit of sogginess, then let it cool down before fill them up with custard.
Not sure about how it will stand up and to control the size of the tower, I made a paper cone out of parchment paper. I knew the caramel won't stick to the paper and I can always deconstruct the paper cone if it does stick to it - a better idea then using a bowl as a mold.


Then the fun part - making the caramel and assembly! These two steps has to be done continuously, so set up the table next to the stove, get a wet towel ready, line up the puffs before making the caramel.

The assembly is actually pretty easy. The key is to act fast, be responsive (don't let the sugar burn and don't let it cool down too much), and prepare to burn some fingers! If you go accidentally put your fingers into the hot caramel,  use the wet towel. For some reason, the first thing i did was to put it in my mouth. Lucky I didn't burn my tongue as well!

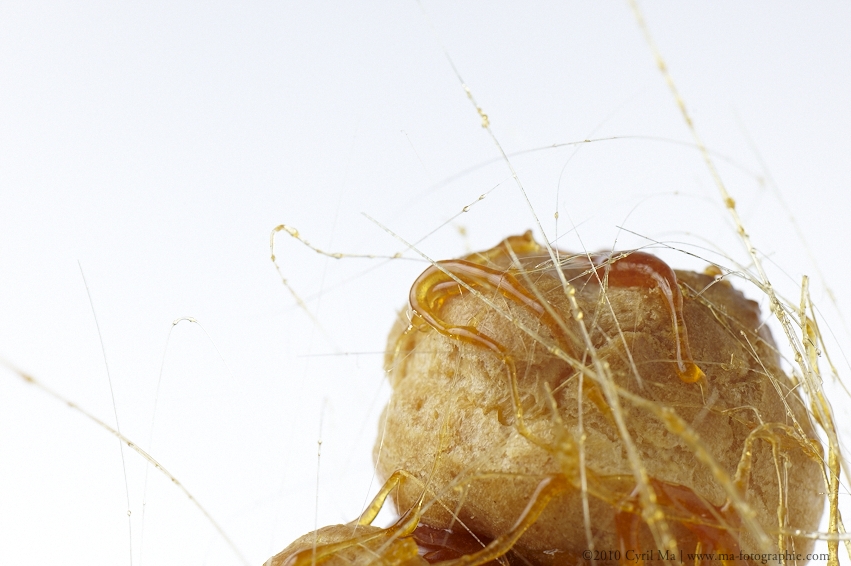
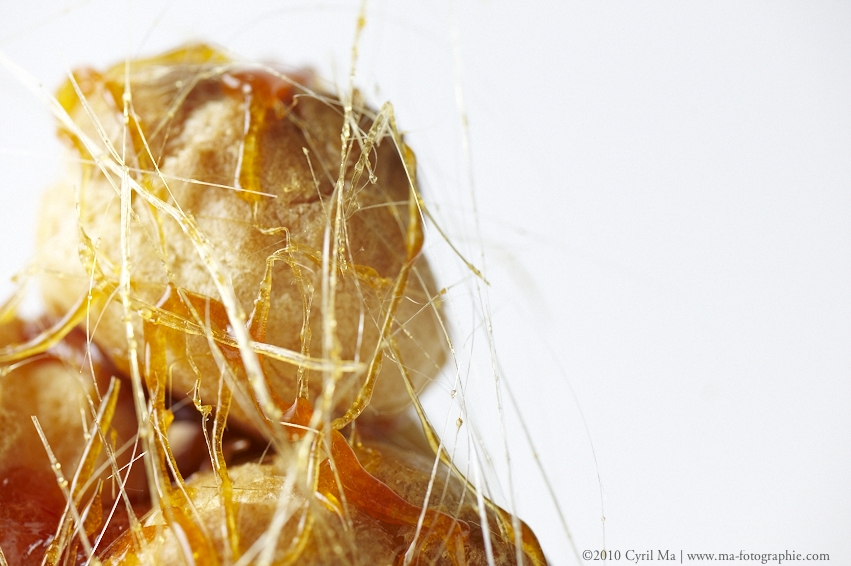
I used the remainder of the caramel to spun some sugar strands to wrap the croquembouche around. Viola! My first croquembouche was born!
So proud of myself. And believe it or not, I did these all in my 12 square feet kitchen!

Thursday, March 11, 2010

Big Project Part 1


I set up a challenge for myself today. It's in progress. The first stage product smells really good and the smell is still lingering around my kitchen.


Stay tuned for the result!

The problem is, this batch is quite big. Who is going to eat the finished product?

Wednesday, March 10, 2010

Mango Sago Soup

To celebrate the beginning of mango season and to make good use of my box of 18 mangoes, I made mango sago soup tonight. It is simple and super fast!

Ingredients: (for 2)
2 mangoes
1 slice of pomelo
2 tbsp sago
1/4 cup coconut milk
1/4 cup cold water
rock sugar syrup to taste

Method:
Bring 2 cups of water to boil. Put sago into the boiling water, stir, cover and turn off the heat. Check after 20 minutes. All sago should be clear. Run it under cold water and drain. Reserve.
Break up pomelo flesh into small pieces. Reserve.
Buzz mango flesh in the blender until smooth. Mix in coconut milk and check for taste and consistency. Adjust sweetness with rock sugar syrup to taste and cold water to thin it out.
Add reserved sago and pomelo. Chill and serve!

Monday, March 8, 2010

Mango Cream Puff

Time flies. It's mango season already!

A few years back mango season only limited to July and August. This year, mangoes are available in March! They taste AWESOME!


If you don't know me, you probably wouldn't know I am going to school for baking class on Saturdays. So this week we made choux pastry. I cut up some juicy mangoes and added hand whipped fresh cream in the puffs. Delicious!

LinkWithin

Related Posts Plugin for WordPress, Blogger...